High available and scalable RDS with Multi-AZ and read replicas
In this post, we'll demonstrate how to set up a multi-AZ PostgreSQL RDS using Terraform as the Infrastructure as Code, and then scale it with read-replicas.
Amazon Relational Database Service (RDS) simplifies the setup, management, and scaling of relational databases in the cloud. Most relational databases are supported, including PostgreSQL, SQL Server, Oracle, MySQL, and MariaDB.
In this article, we will look at how to improve the availability and reliability of a PostgreSQL database on RDS using Terraform, we will see how to setup RDS Multi-AZ, and lastly how to scale our Rds database using Read-replicas.
What is a Multi-Az?
AWS RDS Multi-AZ provides high availability and failover support for database instances, it automatically creates a secondary standby replica of the database instance in a different availability zone. RDS replicates data to the standby instance synchronously.
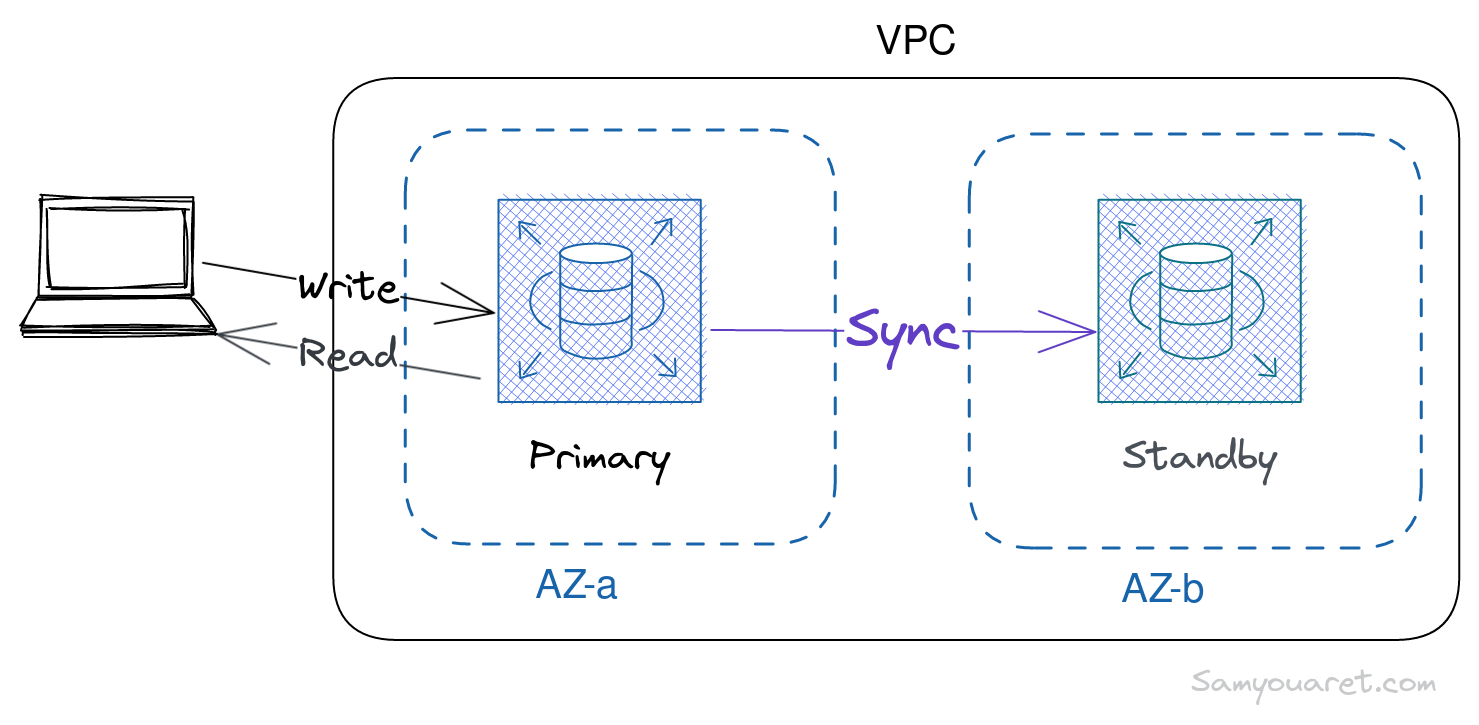
If a failure or maintenance problem occurred. Amazon RDS automatically detects the failure and fails over to a standby instance without manual intervention. This helps to ensure that database workloads remain highly available and operational even if an availability zone failure occurs.
Setting up the project
We will use Terraform to manage the AWS resources, Terraform must be installed on your machine.
Let’s start our project with the AWS provider in the main.tf file.
terraform {
  required_providers {
    aws = {
      source  = "hashicorp/aws"
      version = "~> 4.0"
    }
  }
}

data "aws_availability_zones" "available" {}

## PROVIDERS
provider "aws" {
  region = "us-east-1"
}
Then run
terraform init
Creating the first Postgres instance
The first resource we are going to create is the RDS instance, at this point we will not yet create multi-AZ with the standby instance.
let’s create the file rds.tf.
resource "aws_db_instance" "postgres_instance" {
  # Initial database created.
  db_name = "orders_db"
  ## we use postgres
  engine         = "postgres"
  engine_version = "14"
  instance_class = "db.t3.micro"
  username       = var.db_username
  password       = var.db_password
  # only for this tutorial
  publicly_accessible = true
  # allow minor version upgrade
  auto_minor_version_upgrade = true
  # keep backup for 7 days
  backup_retention_period = 7
  db_subnet_group_name    = aws_db_subnet_group.rds_postgres.name
  vpc_security_group_ids  = [aws_security_group.postgres_sec_group.id]
  # storage allocated is 20GB
  allocated_storage = 20
  storage_type      = "gp2"
  # Database storage auto-scales up to the 100GB
  max_allocated_storage = 100
  #  disable taking a final backup when we destroy the database(for this tutorial).
  skip_final_snapshot = true

}
The configuration will create a t3.micro RDS instance with PostgreSQL as the engine and 20GB of gp2 (general purpose 2) storage. Following that, we’ll go over how to set up the instance VPC subnet group and the vpc security group that will be associated with the RDS instance.
We need to create two variables for the username and password that we will use to connect to the Postgres instance. let’s Create the variables.tf file:
variable "db_username" {
  type        = string
  description = "Username for postgres"
  sensitive   = true
}

variable "db_password" {
  type        = string
  description = "password for postgres"
  sensitive   = true
}
Setting up the Instance network
We will use the vpc module to create a VPC with two public subnets. Additionally, we will create a security group to permit Postgres traffic on port 5432. For this tutorial, we will use public subnets, but it is important to note that in a production environment, private subnets are the recommended option.
let’s create network.tf file with the following code:
## use vpc module to create two public subnets in different AZ's
module "vpc" {
  source               = "terraform-aws-modules/vpc/aws"
  version              = "2.77.0"
  name                 = "rds_vpc"
  cidr                 = "10.0.0.0/16"
  azs                  = data.aws_availability_zones.available.names
  public_subnets       = ["10.0.1.0/24", "10.0.2.0/24"]
  enable_dns_hostnames = true
  enable_dns_support   = true
}

## subnet group to attack to RDS Instance
resource "aws_db_subnet_group" "rds_postgres" {
  name       = "rds_postgres"
  subnet_ids = module.vpc.public_subnets

  tags = {
    Name = "rds_postgres"
  }
}

# Security group for postgres traffic
resource "aws_security_group" "postgres_sec_group" {
  name        = "rds_sec_group"
  vpc_id      = module.vpc.vpc_id
  description = "Security group for RDS instance"

  ingress {
    from_port   = 5432
    to_port     = 5432
    protocol    = "tcp"
    cidr_blocks = ["0.0.0.0/0"]
  }

  egress {
    from_port   = 0
    to_port     = 0
    protocol    = "tcp"
    cidr_blocks = ["0.0.0.0/0"]
  }
}
At this stage, we are ready to plan and apply our Terraform file. However, since we have added the vpc module, we need to run the init command to download it first.
terraform init
Then we can run the plan command
terraform plan
Getting Connection endpoint
To retrieve the connection URL for an AWS RDS instance using terraform, we can create an output.tf file with the following code:
# get the database URL after creating DB
output "rds_instance_connection_url" {
  value = aws_db_instance.postgres_instance.endpoint
}
Enabling Multi-AZ
The only thing we need to enable multi-AZ is to set multi_az to true in the Terraform aws_db_instance resource in rds.tf file.
+ multi_az = trueWe can now deploy our multi-AZ RDS instance. Let’s plan our infrastructure.
terraform plan
Next, we execute the apply command.
terraform apply
We have successfully set up a multi-AZ database on RDS at this point. It is important to note that the standby instance has no direct access and we cannot connect to it. When the primary instance fails, Amazon RDS automatically updates the DNS record for the primary endpoint to point to the standby instance, ensuring a smooth failover process.
Detailed explanation of RDS Terraform resource
Let’s go deeper into the resource “aws_db_instance” that defines the RDS Instance. we will explain each field used one by one:
-
db_name: Create a database named orders_db when the RDS instance is created.
-
engine: The type of database engine to use for the RDS instance. In our case, it’s PostgreSQL.
-
engine_version: The version of the PostgreSQL database engine to use.
-
instance_class: The instance type to use for the RDS instance.
-
username: The username to use when connecting to the database.
-
password: The password to use when connecting to the database.
-
multi_az: Specifies whether the RDS instance should be created in multiple availability zones for high availability.
-
publicly_accessible: A boolean Whether the RDS instance should be accessible from the internet.
-
auto_minor_version_upgrade: A boolean whether the RDS instance should automatically upgrade to minor versions.
-
backup_retention_period: Specifies the number(7) of days to keep backups for the RDS instance.
-
db_subnet_group_name: Specifies the subnet group to use for the RDS instance.
-
vpc_security_group_ids: Attach the created security group to the RDS instance.
-
allocated_storage: Specifies the amount of storage, in GB, to allocate for the RDS instance.
-
storage_type: Specifies the type of storage to use for the RDS instance. gp2 stands for general-purpose SSD storage.
-
max_allocated_storage: Specifies the maximum amount of storage, in GB, to allocate for the RDS instance.
-
skip_final_snapshot: Specifies whether to skip creating a final snapshot when the RDS instance is destroyed.
Is it possible to use an RDS standby instance for read scaling?
We cannot use a standby replica to serve read traffic in Multi-AZ deployments because it is not a read scaling solution. Multi-AZ maintains a standby replica for high-availability failover. It is only available when RDS promotes the standby instance to primary. To serve read-only traffic, we should instead use a Read Replica, which we will look at later in this article.
Connecting to the database
After creating an RDS instance using Terraform, we can connect to it using the psql or pgAdmin. Here are the steps to connect to our RDS instance using the psql.
To connect to your RDS instance, we will use the following command, replacing <RDS_ENDPOINT>, and
psql -h <RDS_ENDPOINT> -p 5432 -U
let’s test our setup with the following SQL example.
CREATE EXTENSION IF NOT EXISTS "uuid-ossp";

create table if not exists products(
	id uuid PRIMARY KEY DEFAULT uuid_generate_v4(),
	createdAt TIMESTAMP default CURRENT_TIMESTAMP NOT NULL,
	name varchar(100) NOT NULL,
	qty integer
);

Insert into products(name,qty) VALUES ('Iphone proMax', 10)

-- we can query now our database

SELECT * FROM products;
deploying a Read Replica
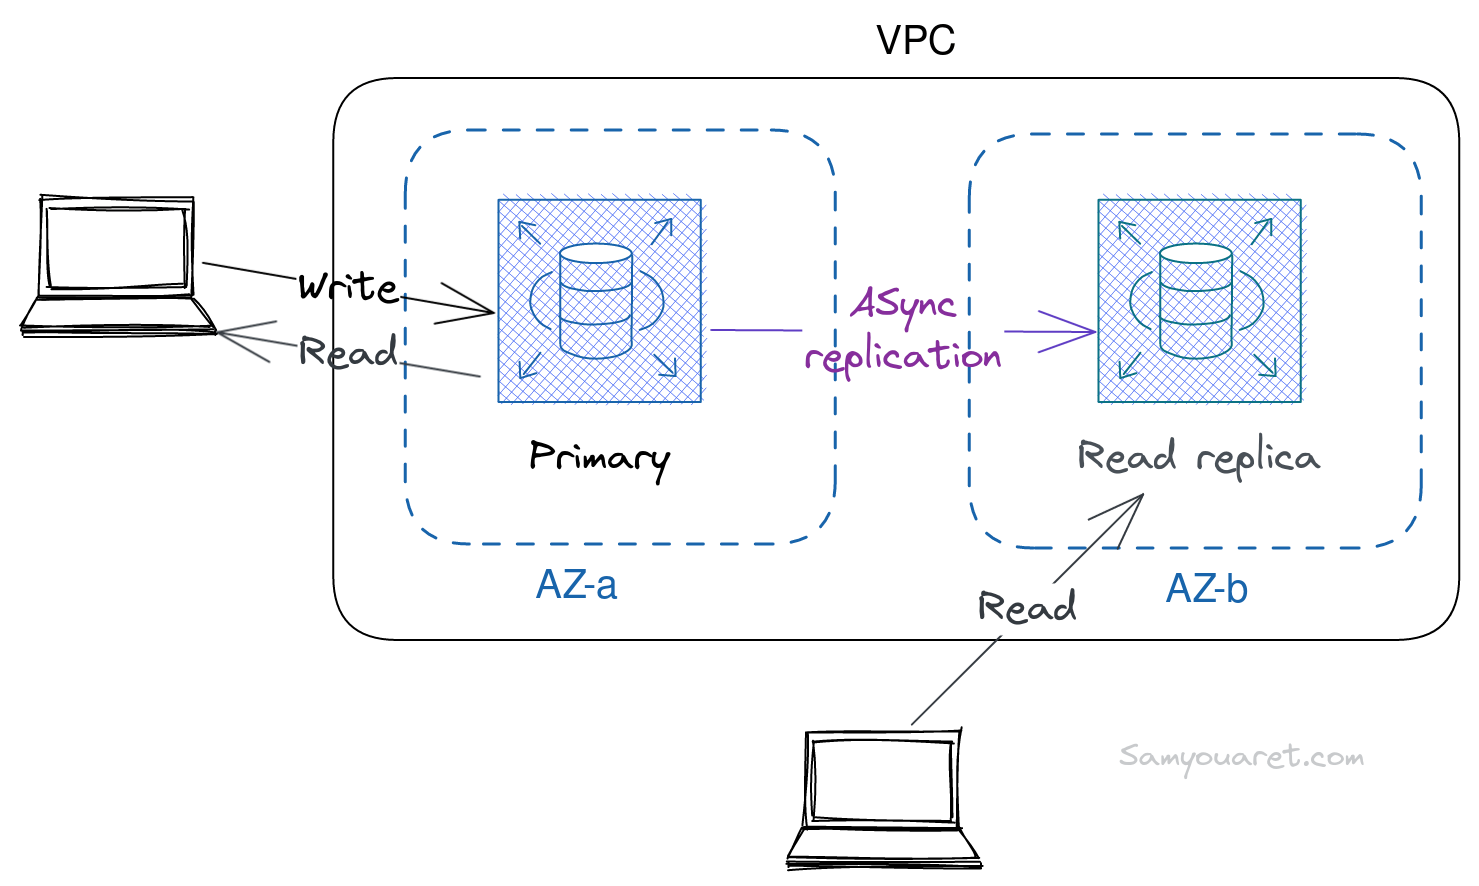
We can use RDS to create one or more replica Instances to handle heavy application read traffic and increase read throughput. RDS read replicas can only be used for read traffic, although in the case of a disaster, we can manually promote a read replica to a standalone DB instance.
let’s create rds_replica.tf file that contains the following terraform code:
resource "aws_db_instance" "postgres_instance_replica" {
  # use order instance as the source of our read replica
  # db_name = "orders_db"
  instance_class = "db.t3.micro"
  replicate_source_db    = aws_db_instance.postgres_instance.identifier
  vpc_security_group_ids = [aws_security_group.postgres_sec_group.id]
  publicly_accessible    = true
  skip_final_snapshot    = true
  apply_immediately      = true
  # engine, allocated_storage, username, and password
  ## will inherit them for the primary instance
}
in the output.tf add the following config to get the read-replicas Address.
+ output "rds_replica_connection_parameters" {
+  description = "RDS replica instance connection parameters"
+  value       = aws_db_instance.postgres_instance_replica.address
+ }
We can deploy our new Read replica now. Let’s plan our infrastructure.
terraform plan
Next, let’s apply the new change.
terraform apply
Connecting to the read-replica
Getting the RDS_REPLICA_ENDPOINT value from output.tf and use to connect to the read replica using same username and password of the primary instance.
psql -h <RDS_REPLICA_ENDPOINT> \
-U username
After connecting to the read replica, run this sql:
CREATE DATABASE orders_db;Oops! you get an error, right? ERROR: cannot execute CREATE DATABASE in a read-only transaction.
This occurs because read replicas in RDS are read-only and cannot execute any statements that modify the database, including creating a new database. This is done to ensure that the read replica represents the primary database consistently and accurately. So we need to perform the CREATE DATABASE statement on the primary database, which will then be replicated to the read replica.
To test the new read replica, we connect to the primary instance and run the previous Insert SQL used in the first example.
then switch back to the read replica connection and run it again.
SELECT * FROM products;we should see the inserted row.
                  id                  |         createdat          |     name      | qty
--------------------------------------+----------------------------+---------------+-----
 52c019c1-80e4-418c-975b-e73eb836e624 | 2023-02-03 14:59:35.253284 | Iphone proMax |  10
(1 row)
Multi-Az or Read replica?
Using only read replicas without a multi-AZ setup provides scalability for read-heavy workloads, but it lacks high availability and automatic failover capabilities.
In the event of a primary instance failure, AWS RDS does not support the automatic promotion of read replicas. Instead, deploying both multi-AZ and read replicas allows us to balance scalability and resilience in our RDS setup.
If we insist on using only read replicas and require high availability, we must write a script that detects failures in the primary instance and triggers the promotion of the read replica.
The GitHub repository for this Article could be found at this link: github
Conclusion
In this article, we have discussed how to create and manage AWS RDS with Terraform, and also how to manage and create Multi-AZ and read replica.
For RDS, Multi-AZ offers high availability and automated failover capabilities. RDS Can create one or more instances of the database in various Availability Zones when using a Multi-AZ configuration, offering a highly available and reliable solution. In the event of a primary instance failure, the RDS service automatically promotes a secondary instance to take its place, ensuring that the data remains available and accessible.
Read replica, on the other hand, is a useful feature for read-heavy workloads. Read replicas are read-only and do not provide high availability or automatic failover capabilities.
Ultimately, both Multi-AZ and read replicas are valuable features of RDS that can be easily deployed and managed with Terraform. Depending on the needs of our application, RDS allows us to choose the appropriate deployment options to ensure high availability, automatic failover, or scalability for our RDS setup.
